How to Wrap Gifts: A Box Tutorial, Gift Bags, and Cloth Wraps
To wrap a gift, choose a method that suits its shape, then check how much paper will go around it and cover both ends before cutting. Wrap a rigid box with paper; switch to a ready-made gift bag or a cloth when a soft or irregular item will not hold crisp folds. This tutorial works through one 8 × 5 × 2.5-inch box, including the paper measurements and fixes for common problems.
Choose paper, a gift bag, or cloth for the item
First decide whether you will hand the gift to someone or ship it. The methods below provide decorative wrapping. They do not replace cushioning, leak protection, or a shipping container.
| What you are wrapping | Start with | Check first |
|---|---|---|
| A closed rectangular box | Paper wrapped around the body, followed by folded ends | The lid stays closed and the contents can safely be turned upside down. |
| Soft clothing or a scarf | A suitably sized gift bag or square cloth | Keep any protective inner packaging; do not squeeze the item just to create sharp corners. |
| An irregular object or several small pieces | A box that keeps the contents together | Secure loose parts and protect projections that could puncture the wrapping. |
| Glass, liquids, or other fragile items | Protection appropriate to the product | Tissue, decorative paper, and a cloth knot are not substitutes for protective packaging. |
If you are shipping the present, follow the carrier’s instructions for that item. For example, FedEx’s U.S. gift-shipping guide calls for a sturdy box with room for cushioning and protection for fragile contents. Finish the decorative wrapping inside an appropriate shipping package; a bow does not make a parcel ready for transit.
Gather a few supplies and prepare the box
You need a closed box, wrapping paper, a ruler or tape measure, a pencil, scissors, and tape. Ribbon and other decorations are optional. Plain paper or a small repeating pattern makes it easier to see your folds. Stiff paper, glitter, and slippery coatings can behave differently when folded or taped, so try a scrap before working on the gift.
- Prepare the contents. Keep them from moving and close the lid. Retain instructions, ingredient labels, and storage information. Do not open a product’s original seal merely to make wrapping easier.
- Choose where the tape will go. Join wrapping paper to wrapping paper where possible, rather than sticking it to the product, a book cover, or an original product box you want to preserve.
- Clear the work surface. Use a clean, dry table large enough for the paper and box. Close the scissors when you put them down. If a child is helping, assign cutting and other tool use appropriately.
The box example is worked with its presentation face down. If the contents must stay upright, do not invert them to follow this layout. Choose a bag or another suitable packaging arrangement instead.
Measure paper for an 8 × 5 × 2.5-inch box
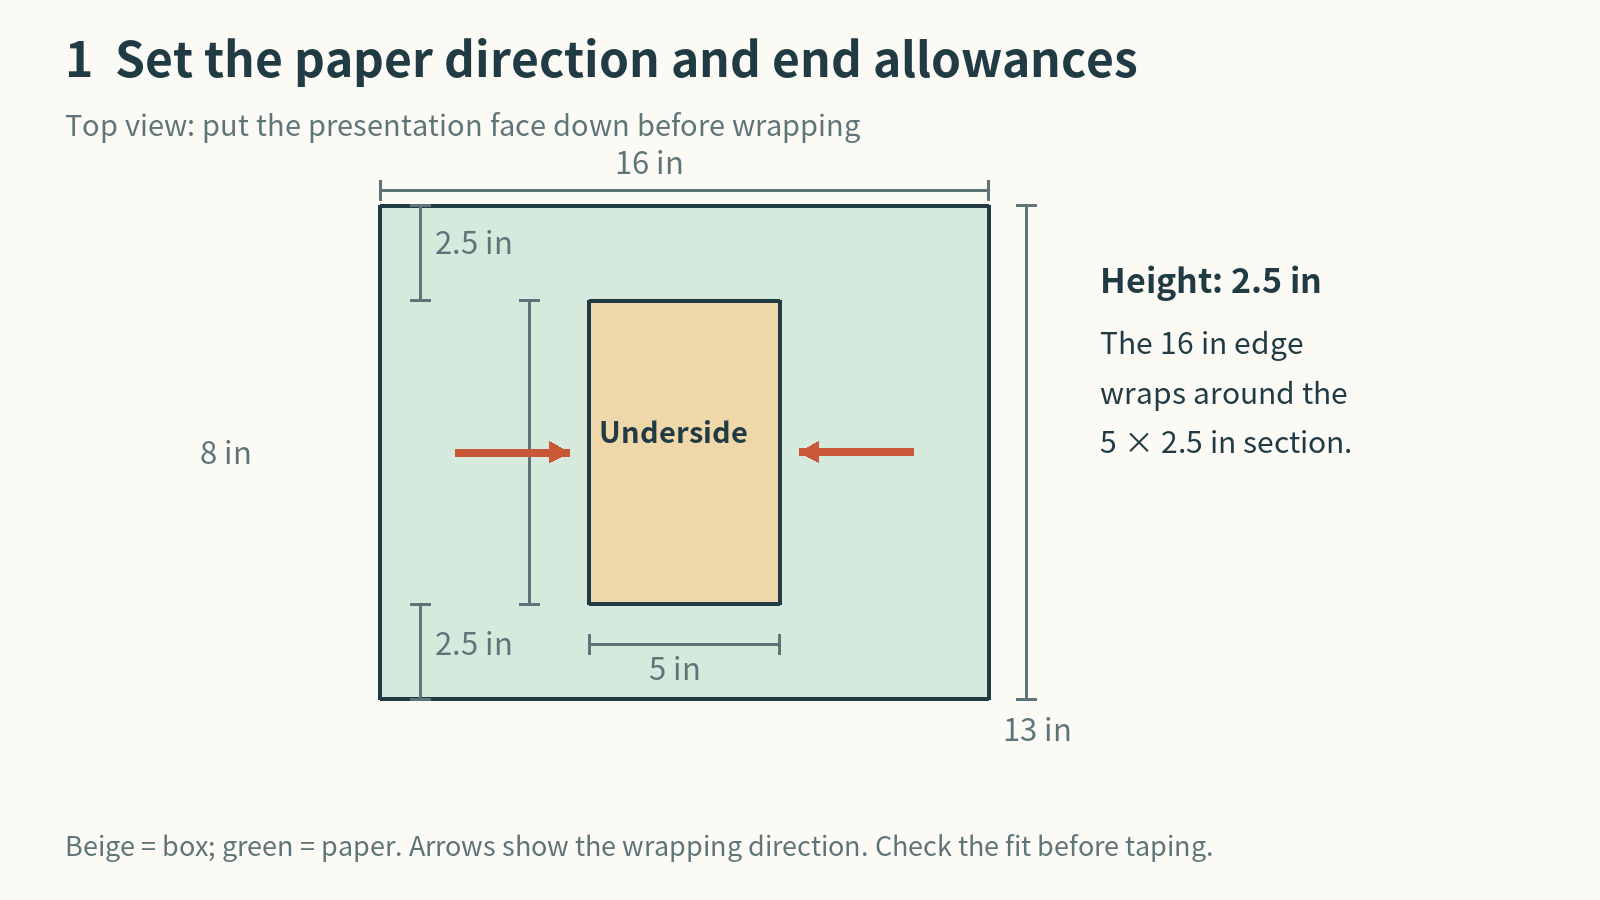
For this example, the box is 8 inches long, 5 inches wide, and 2.5 inches high. Place the 8-inch length parallel to the paper’s 13-inch edge. The paper’s 16-inch edge will go around the 5 × 2.5-inch cross section. Naming the direction matters: “paper length” and “paper width” are easy to swap when you rotate a box.
| Paper direction | Calculation in inches | What the allowance does |
|---|---|---|
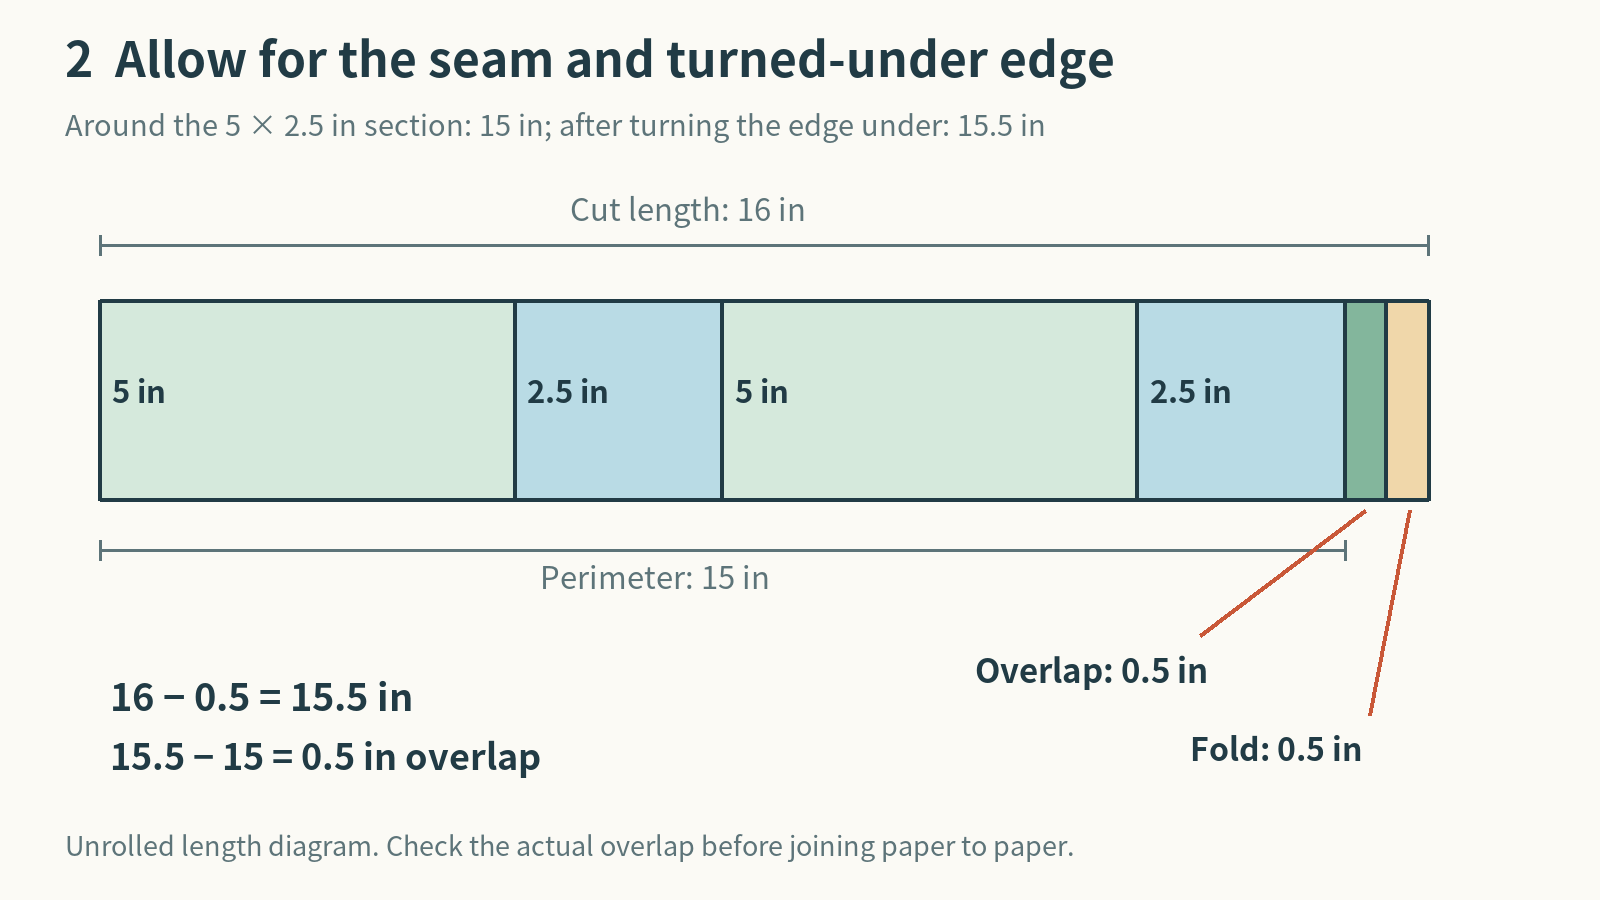
| Around the body | 5 + 2.5 + 5 + 2.5 = 15 15 + 0.5 overlap + 0.5 turned-under edge = 16 |
Turning the last edge under by 0.5 inch still leaves a 0.5-inch overlap at the seam. |
| Parallel to the box’s long axis | 8 + 2.5 + 2.5 = 13 | Centering the box leaves 2.5 inches of paper beyond each end. |
| Piece to cut | 16 × 13 inches | Check the fit on your actual box before cutting or taping. |
These are worked-example allowances, not the minimum paper area or a universal size for every box. Wrap Crafters’ measuring explanation likewise separates the distance around a box from the allowance for its ends. Its illustrated orientation and overlap differ from this example, so do not combine one diagram’s axis labels with another example’s numbers.
Before committing to the cut, loosely bring a larger sheet around the actual box and mark the required edges. Turn the final edge under by half an inch during this trial, then check that the two edges overlap and both ends can close. Paper thickness, the box’s actual dimensions, and the folds you make can affect the fit. If the edges only touch, allow more paper rather than taping across a gap.
Wrap the box in six steps
Keep the presentation face down so the long seam ends up underneath. Work on the body first, then close the ends. You can also consult Hallmark’s illustrated box-wrapping guide for the basic trial-fit, body-wrap, and end-fold sequence.
- Set the orientation. Put the paper’s reverse side up. Align the box’s 8-inch length with the paper’s 13-inch edge, leaving 2.5 inches beyond each end. Loosely bring the paper around the body to locate the seam before applying tape.
- Close the body seam. Bring the first edge onto the upward-facing underside. Turn the final edge under by 0.5 inch, bring it over the first, and check the 0.5-inch overlap. Smooth the paper against the box and tape paper to paper without pulling hard enough to tear it.
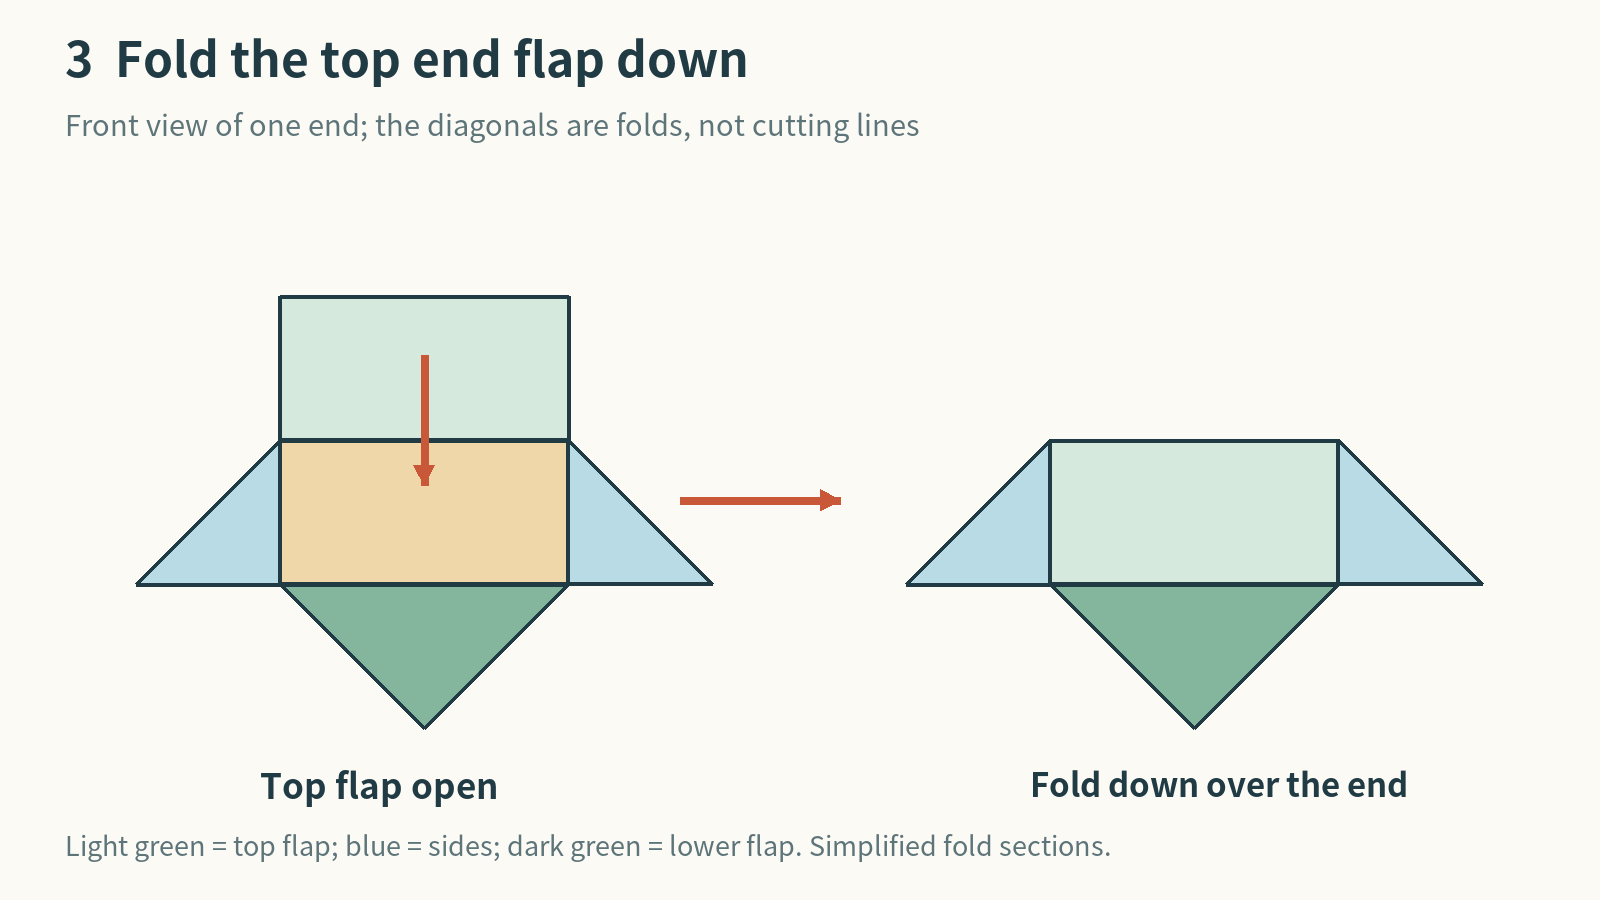
- Fold the top end flap down. Face one open end. Fold the paper extending from its top edge down against the end face, using the box edge to locate the crease.
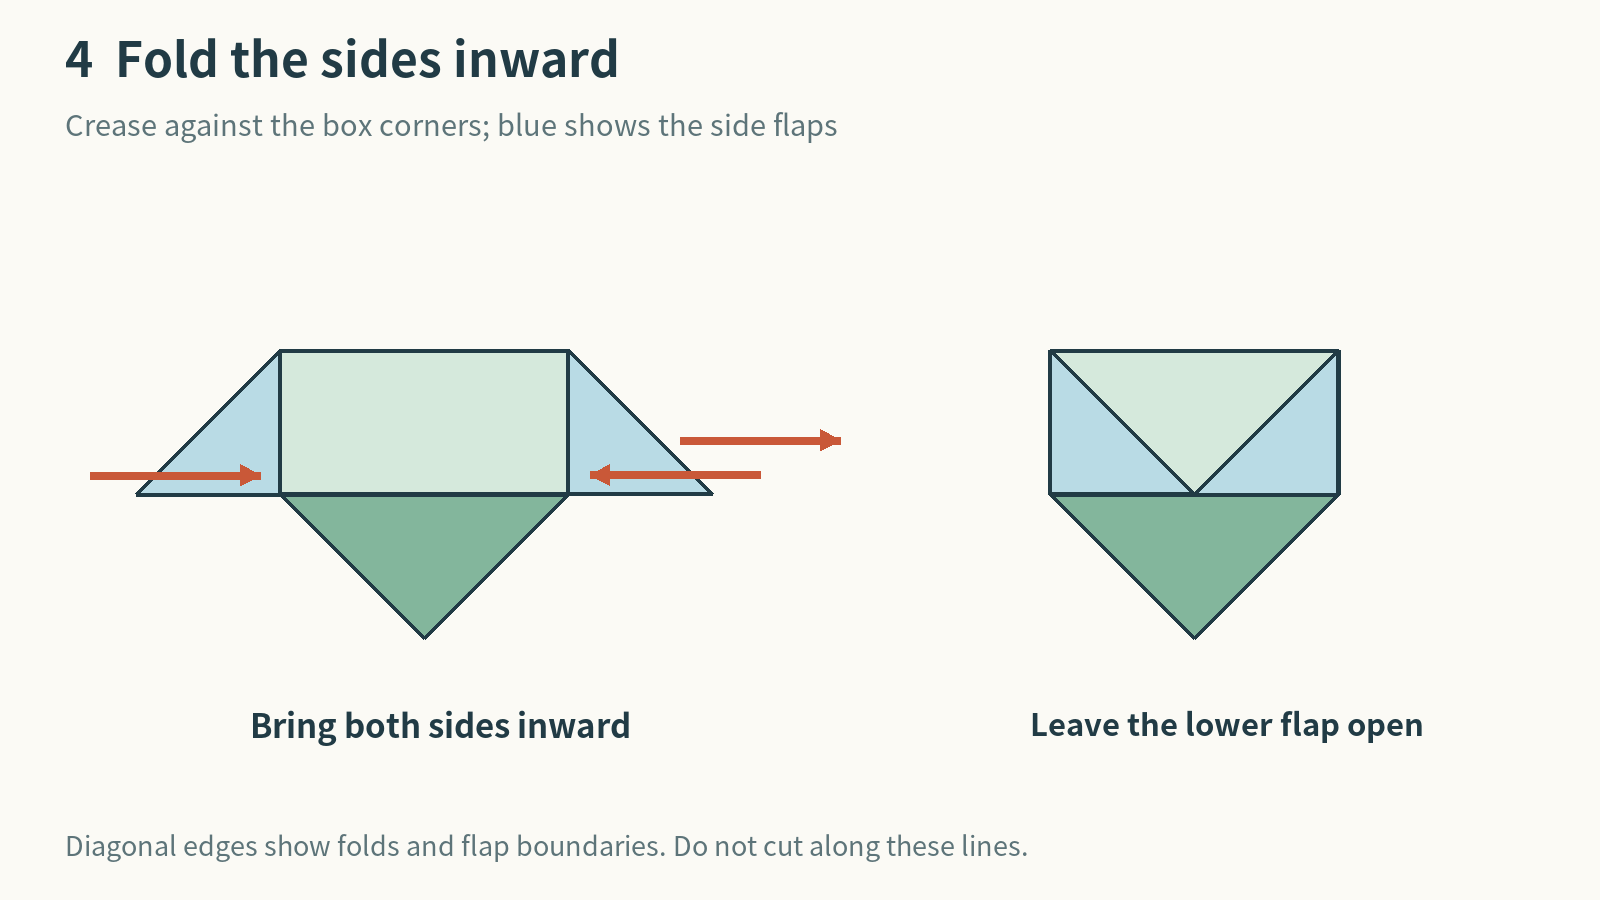
- Fold the sides inward. Press the left and right paper toward the center of the same end. Crease the diagonal folds against the corners, leaving the lower flap available to fold up. These are folds, not diagonal cuts.
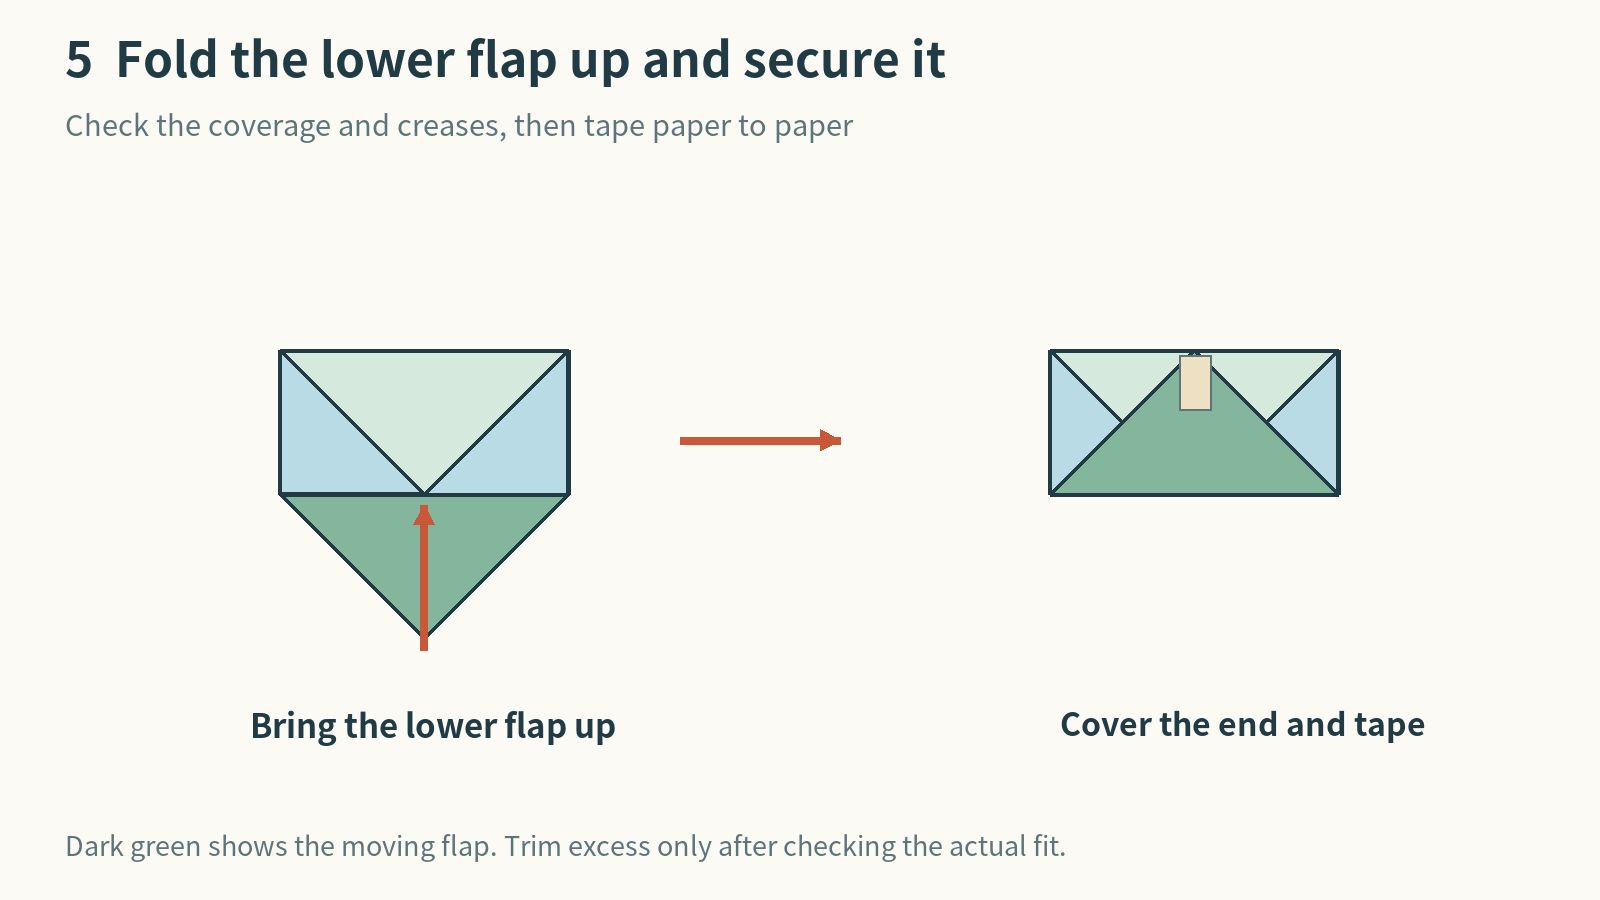
- Bring the lower flap up. Fold it against the end face and secure it. If the generous end allowance bunches, reopen it and check the creases. Trim excess only after checking that the remaining flap will cover the end.
- Finish the other end and check the top. Repeat top down, sides inward, then bottom up. Turn the finished box presentation-side up and check for exposed corners or an opening seam. Add decorations afterward.
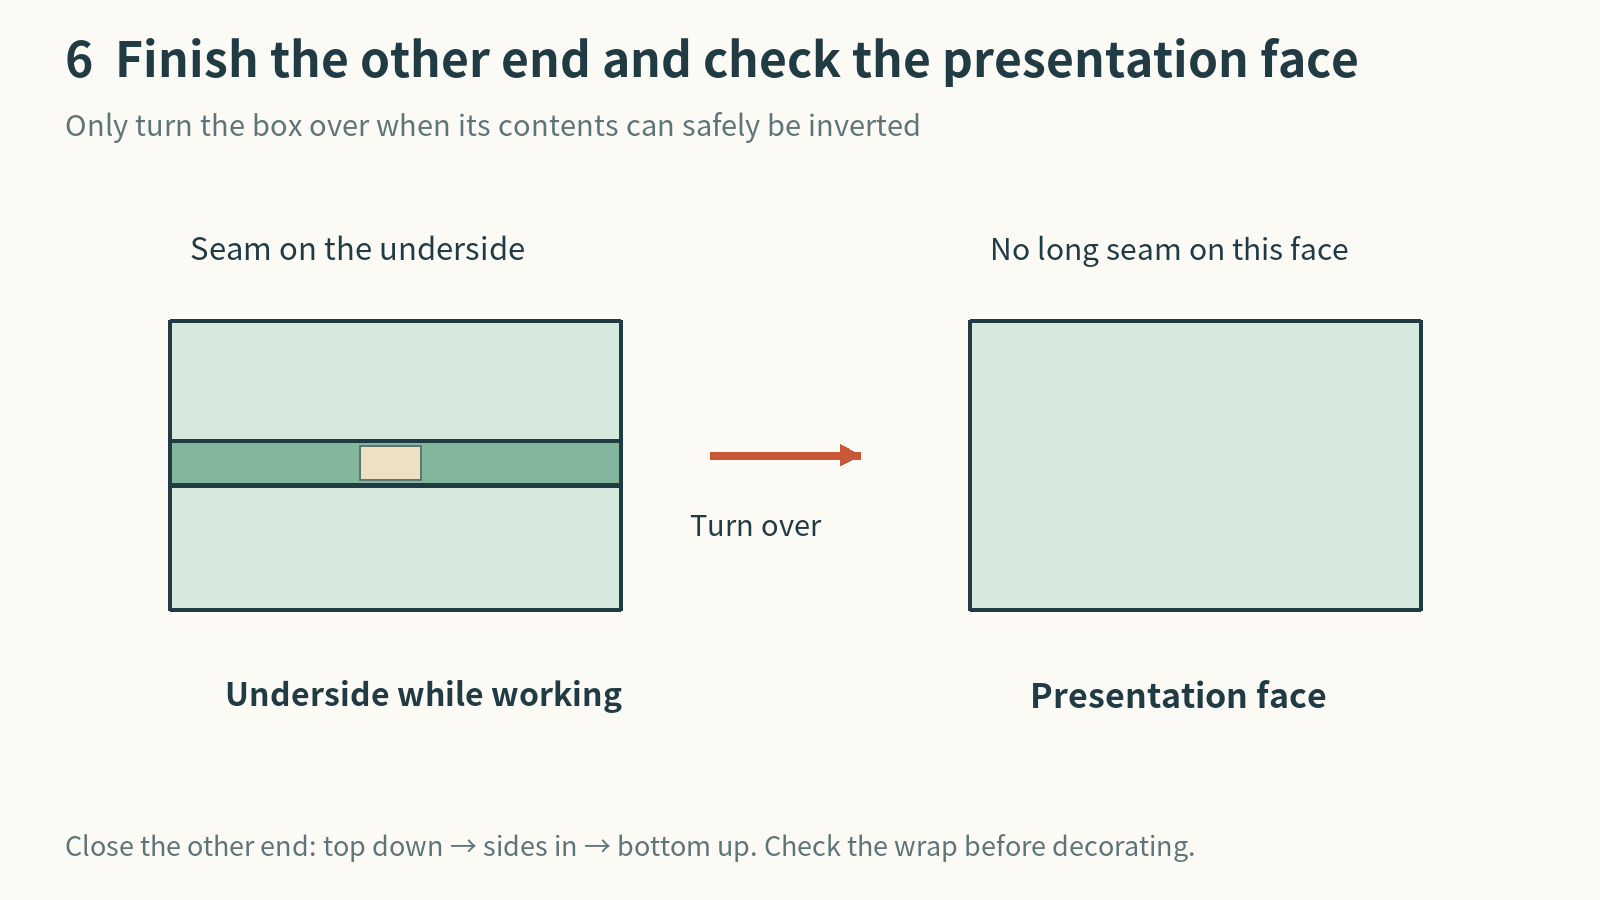
“Top,” “sides,” and “bottom” refer to the end face you are looking at during that step. If you rotate the box, reset that reference before folding. Recheck both end allowances after closing the body seam: pulling on one end can shift the box and shorten the other.
Fix short paper, uneven ends, and bulky folds
Before adding tape, identify the cause: too little paper around the body, an off-center box, or folds that miss the corners. Reopen only what you can release without forcing it. Strong tape can tear paper when removed; switching to a bag or a new sheet may be easier than rescuing a badly damaged wrap.
| Problem | What to check | A practical correction |
|---|---|---|
| A gap along the body seam | The wrapping direction is too short, or too much was turned under. | A 14-inch piece minus a 0.5-inch turned-under edge leaves 13.5 inches, which is 1.5 inches short of the 15-inch perimeter. Use an adequately overlapping contrast strip or a larger sheet; do not stretch the paper. |
| Only one end is short | The box may have shifted off center. | If the allowances are 3.5 and 1.5 inches, release the body seam if possible and shift the box 1 inch to make both ends 2.5 inches. Do not trim the longer end first. |
| The end is bulky or tape lifts | There may be too much paper, misplaced creases, or an unsuitable surface for the tape. | Reopen the end, crease against the actual corners, and remove only verified excess. Test tape on a scrap before using more on the gift. |
| A corner puffs out or tears | A crease may miss the edge, or the paper may be under too much tension. | Realign and smooth the fold. Patch a small tear or replace the wrapping instead of pulling harder to hide it. |
A patch needs room to attach on both sides of a gap. For the 1.5-inch gap above, a strip 3 inches wide provides a 0.75-inch overlap on each side: 1.5 + 0.75 + 0.75 = 3. Its other dimension must cover the full exposed seam. Treat the contrasting strip as a deliberate design detail rather than expecting an invisible repair.
Use a ready-made bag for soft or awkward shapes
A bag avoids forcing sharp corners into clothing or a soft toy. Check its base and side gussets as well as its apparent width. Retailers may list dimensions in different orders, so open the base and check the actual fit rather than relying on one number.
- Keep suitable inner packaging, or use an appropriate inner pouch to keep parts together and protect against dirt. Arrange separate protective packaging first if the item is fragile.
- Open the bag’s base and set the gift inside. If the base sags or the sides strain, choose a stronger box or a better-sized bag. Extra decorative tissue does not solve a weight problem.
- If desired, loosely cover the contents with tissue paper. Arrange it without blocking the opening or handles. Distinguish this decoration from the cushioning required for breakable objects.
- Check the handles and base for damage, follow any stated load limit, and support the bottom while carrying the gift.
To preserve a bag for reuse, consider a small closure sticker or removable decoration rather than taping the entire opening shut. Whether adhesive will come off cleanly depends on the materials; do not promise damage-free removal.
Fit a square cloth and finish with a square knot
Spread a clean, dry square cloth and check that it can cover the gift while leaving enough of the remaining corners to tie. Fabric thickness and the object’s height affect the size you need. Try the fit rather than assuming that one cloth measurement works for every box; a stable, low box makes the sequence easier to follow.
The simple cover-and-tie method below can be found in Japan’s Ministry of the Environment furoshiki diagrams and Musubi’s illustrated cloth-wrapping and knot instructions. Furoshiki refers to the Japanese wrapping cloth; use these sources as practical references for the method.
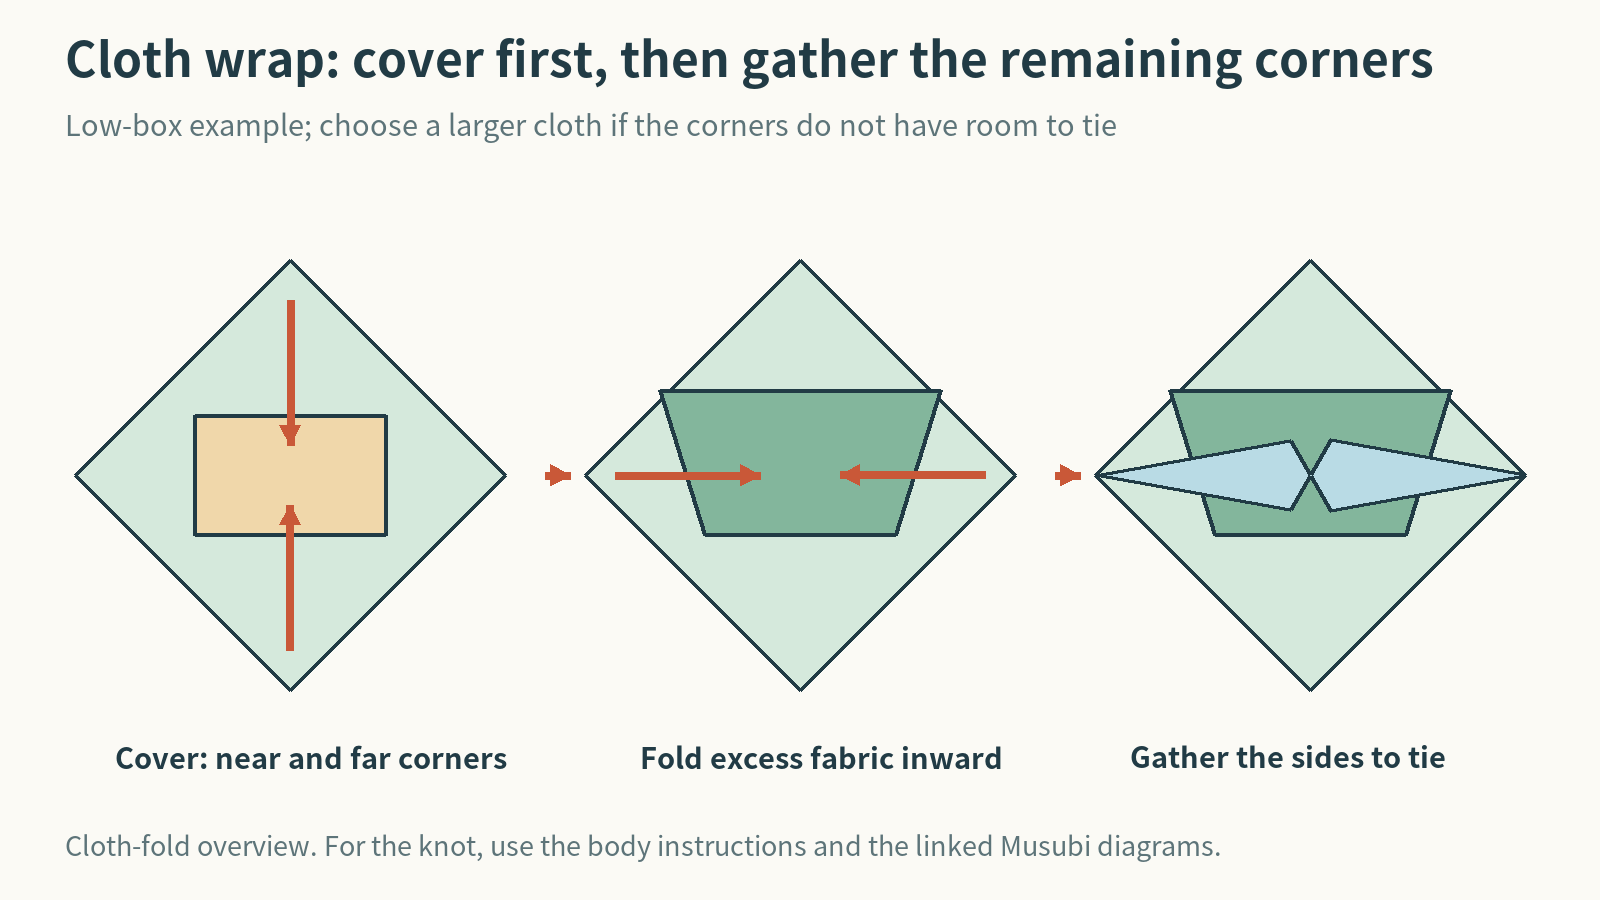
- Cover with the near and far corners. Lay the cloth as a diamond and place the gift centrally. Bring the near corner over the box and tuck the excess underneath. Cover it with the far corner, folding excess fabric inward.
- Gather the remaining corners. Bring the left and right ends together above the box. If they barely meet or you must squeeze the gift to pull them together, choose a larger cloth.
- Tie a square knot. Make one half-knot, then reverse the crossing direction for the second. For example, tie right over left first, then left over right, referring to the ends’ current positions each time. If the knot twists upright instead of lying neatly across the wrap, undo it and check the crossing direction.
Check the wrap on the table and support the gift underneath when moving it. Do not assume the knot is a carrying handle. Heavy items, glass, and liquid containers need suitable support and protection before you add a cloth wrapper.
Check the finished gift before adding decorations
- Are the corners and both ends covered, with an overlapping seam rather than two edges merely touching?
- Are the contents stable and uncompressed, and can the recipient find where to open the wrapping?
- Are instructions, ingredient and storage information, and any records needed for an exchange still available?
- Have you removed previous names, addresses, and contact details from reused packaging?
Save clean, intact paper for a smaller gift or a design that can use its existing creases. Inspect bag handles and bases before storing them, and check cloth for dirt or fraying. When discarding materials, check their composition and your local collection rules instead of assuming that every coated, glittered, or mixed-material wrapper belongs with recyclable paper. Aim first for a gift that is covered neatly, protected appropriately, and easy to open.